
These are some of the various photographs we took during the build. I have started to add comments, but for some unknown reason have started at the end. I have now also discovered that after n comments it ignores the rest. Must find out what causes this.


-

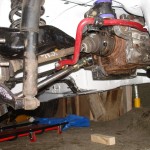
- New rebuilt and resprayed suspension
-

- Engine back in it’s rightfull place
-

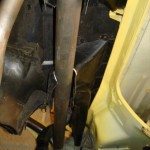
- Trying to work out the best alignment for everything
-

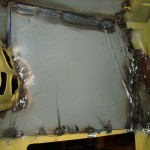
- Rear top mount pre strengthening
-

- Making a paper template for the rear top mount strengthening plate.
-

- Transfer tempate to steel
-

- Result of welding. Always make sure you have an extinguisher to hand in case it all gets out of hand.
-

- Under seal was a little smokey when it’s burning.
-

- Finished reinforced top mount bracket
-

- Not quite concours
-

- Not looked as good as this for a long time.
-

- Hydraulic fittings.
-

- A fantastic way to spend money.
-

- Brake master cylinders installed
-

- Laying out the various components.
-

- Brake line in place, but not secured.
-

- Handbrakes various. One for the MOT man, one for steering.
-

- Start of brake line plumbing
-

- Tank put into position
-

- Boot area layed out
-

- Box of springs from Bad Arsed Designed, or as they should be called Black Art Design.
-

- New springs put onto front struts.
-

- Whiteline front ARB. Or a bent scaffolding tube, not sure which.
-

- Whiteline sticker is pants
-

- To make surround follow these instructions. Measure, cut, bend, measure, cut, bend, measure, cut, bend, meas…… You can see some of the cut marks in this photo
-

- Air intake area.
-

- Early days, but coming along nicely
-

- To convert from pillarless to pilalred doors take 2m angle iron and a sense of adventure….
-

- Making the window surrounds


-

- New windows fitted into new surrounds
-

- Outside needed a touch up, so plenty of masking required.


-

- Funny colour on this. Just to annoy us some polythene fell and landed on this side whilst the paint was still wet.
-

- Not had windows for a long time
-

- Windows fitted
-

- Nearly finished exhaust
-

- Rear silencers
-

- Home made exhaust system
-

- Exhaust
-

- New throttle pedal.
-

- New throttle cable bracket

-

- Sump guard, not very exciting in fairness.
-

- Poor photo of Sump Gaurd

-

- Under bonnet area looking much cleaner than previously
-

- So hard to spray all sides of every tube
-

- Masked and sprayed
-

- Tunnel looks a bit patchy, but it got another coat after this
-

- Interior all sprayed

-

- Top of screen

-

- Opening all prepared and ready for the screen
-

- Preparing the heated screen
-

- The very high bead of sealant for the windscreen
-

- Windscreen nearly fitted
-

- The second hinge for the bonnet that I didn’t know about.
-

- An early mockup of the sump guard.
-

- This seemed much harder to get correct than we thought, but we were determined to make it quick release.
-

- Possible axle stand method.
-

- New bracket to fit the pickup for the trip.
-

- Mocking up the sump guard
-

- All new wheels from Revolution come with a free bathing hat.
-

- Will they ever be this white again ?
-

- New wheels, with tyres fitted.
-

- Inside with door card in place.
-

- New wheels trial fitted
-

- Do not let previous owners see this
-

- Cutting tops of door cards to finish the top of the new door cards with.
-

- Home made door cards. 3mm poly cut to size and sprayed on the back to avoid scratching paint
-

- Car approaching completion
-

- Inside starting to come together

-

- ARB and home made bottom arms
-
- Rear ARB. Nit fitted the new rear shocks yet.
-

- Fuel pump and filters.
-

- Front Strut, Drop links, calipers etc
-

- Front strut all in place
-

- Front springs installed
-

- Sizing up the supports for the oil cooler and sump guard
-

- Looks like it fits OK
-

- Trial fit of front support
-

- New Front Top mounts installed
-

- Fuel pressure regulator
-

- Fuel lines and brake lines in the back seat area.
-

- Details of mounting bracket. This holds the front chassis members apart, mounts the oil cooler and supports the sump guard.

-

- Finished mounting bracket pre painting.
-

- Top view
-

- Bottom of oil cooler mounting bracket, which is where the sump guard will mount to.
-

- Oil cooler mounting bracket in place
-

- Innovative horn mounting position.
-

- Oil cooler all mounted.
-

- Front suspension all built up.
-

- First photo of front of car reassembled.
-

- Home made rear top mount. For more details see the Top Mount page.
-

- Snorkel air intake in case of deep water splashes. Actually you have to buy ducts in metre lengths, and it was the end of the roll so I got a bit more, and really only needed the bit.
-
- Tow hook.
-
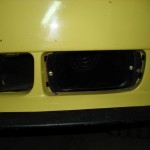
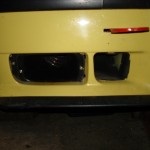
- We replaced the fog lights with air intakes.
-

- View of cold air feed to engine bay.
-

- Air intake.
-

- Helmet box on support before it was painted.
-

- One of the extinguisher points under the bonnet.
-

- Dashboard in place
-

- We glued felt to the dashboard to reduce glare. You have to sand the dashboard with 80 grit sandpaper to make the glue stick. Don’t tell previous owners.
-

- Bonnet pins in place.
-

- Plumbed in extinguisher mounted in place.
-

- Cold air feed from fog light cutout to air intake.
-

- Rough routing of throttle cables. Ran long ones to avoid a tight bend if we ran them along the bulkhead
-

- Support for helmet box
-

- Trying to decipher the wiring loom.
-

- I think this was the fuse box.
-

- Exhaust fume extraction. Big engine = big ducts and big fans.
-

- One of the 3 straps used to stop it taking off into next week.
-

- The brake
-

- The tools of the tuning trade. Note absence of spanners. How time have changed.
-

- The proper man size cooling fans. Forget those little mobile affairs you see used.
-

- Wayne giving it a hard time on the rolling road. Hits the limiter at 176mph in 5th apparently.
-

- Oil leak after the shiny new Oil cooler let go on the rolling road.